
If you use Figma to design apps, websites, or graphics, you know that exported files can get large. Whether you export PNGs, JPEGs, or SVGs, those files often take up more space than you expect. Large exports slow down your workflow and can make sharing assets harder. Fortunately, there are simple ways to reduce size without changing how your designs look.
This guide explains why Figma exports can be big and how to reduce Figma export size in a few practical ways. You don’t need technical knowledge—just a basic understanding of how file formats and export settings work.
Why Figma Export Sizes Get Large
Figma creates high-quality design files that preserve every detail. That quality comes at a cost. When you export an image, especially as a PNG or high-resolution JPEG, Figma includes full color data, transparency, and metadata. These add up to larger file sizes.
For example, exporting a single screen as a 2x or 3x PNG for Retina displays can create files several megabytes in size. Multiply that across multiple screens, and your project folder grows fast.
Why Reducing Export Size Matters
Large export files can affect performance and collaboration. They take longer to upload to design systems or cloud storage, and they can slow down build pipelines when used in apps or websites.
Reducing file size helps in several ways:
- Faster sharing: Smaller files upload and download more quickly.
- Efficient storage: You save space on your device and in cloud folders.
- Better performance: Lightweight assets improve loading times in apps and on websites.
When you reduce size, you make your workflow more efficient without losing the visual quality your work depends on.
How to Reduce Figma Export Size Before Exporting
The first step to smaller exports starts in Figma itself. Here are a few methods that help reduce file size before exporting.
1. Check the export scale
Designers often export at 2x or 3x for high-resolution displays. This makes sense for certain use cases but isn’t always necessary. Exporting at 1x still looks sharp in many contexts and can reduce the file size by more than half.
2. Choose the right format
PNG preserves transparency but creates larger files. If transparency isn’t required, export as a JPEG instead. JPEG files use compression that reduces size while maintaining visual quality for most images. For icons or vector graphics, SVG is often the smallest and most flexible choice.
3. Simplify layers and effects
Every layer and effect adds data to the export. Flattening unnecessary layers or removing extra shadows and blurs can make a difference. Fewer layers mean less complexity and smaller files.
4. Review unused areas
Sometimes extra padding or hidden frames increase export size. Cropping or trimming the artboard to only the visible elements can help.
How to Reduce File Size After Exporting
If you’ve already exported your files from Figma, you can still make them smaller. This is where local compression tools become useful.
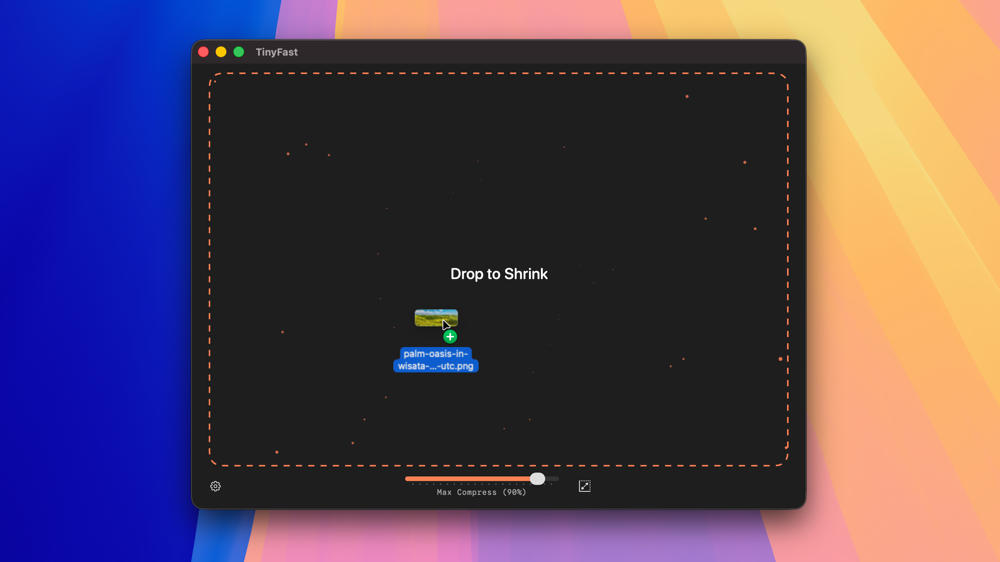
Tools like TinyFast let you reduce size on your Mac without uploading images to a website. You drag and drop your exported files into the app, and it compresses them directly on your computer. This helps maintain privacy and saves time since you don’t need to wait for uploads or downloads.
TinyFast supports PNG, JPEG, GIF, and even PDF and MP4 formats. It also allows you to set compression levels, so you can balance quality and file size. Because the process happens locally, you can batch compress multiple Figma exports in one go.
The Difference Between Compression and Quality Loss
Many people worry that compression reduces quality. For most design exports, this isn’t the case. Image compression removes redundant data that doesn’t affect how the image looks. The colors, shapes, and layout stay the same, but the file size shrinks.
Lossless compression tools preserve full visual quality while still cutting unnecessary data. Even with more aggressive compression settings, most differences are too subtle to notice.
When you reduce Figma export size, your goal is to keep images clear and functional while removing excess weight.
A Simple Workflow for Smaller Exports
If you export assets from Figma regularly, building a lightweight workflow helps:
- Review export settings in Figma and choose the smallest format that fits your needs.
- Export files at 1x unless you need higher resolution.
- Run the exported files through a local compression tool like TinyFast.
- Replace the larger versions in your project folders with the new smaller ones.
This process keeps your exports consistent, small, and easy to manage.
When to Reduce Size
You don’t always need to compress every file, but you should when:
- You’re preparing assets for a website or mobile app.
- You’re sharing files with a team or client.
- You need to archive a project efficiently.
- You want to speed up your own file management.
Even if you only save a few megabytes per image, that adds up across large projects.
Keeping Workflows Private and Secure
If your Figma exports contain sensitive designs, it’s better to use tools that work locally rather than online services. Local tools ensure your files never leave your device, protecting your work from unnecessary exposure.
TinyFast was built with this in mind. It compresses files directly on macOS, so your design assets remain secure while still reducing file size. This approach fits well for professionals who care about privacy but still need efficient compression.
Final Thoughts
Learning how to reduce size in your Figma exports doesn’t require complex tools or advanced settings. It’s about understanding what affects file size and using simple steps to manage it.
Start with your Figma export settings. Choose the right format and resolution. Then, use a local compression app to handle the rest. By combining these small changes, you can reduce Figma export size without losing quality or slowing down your workflow.

